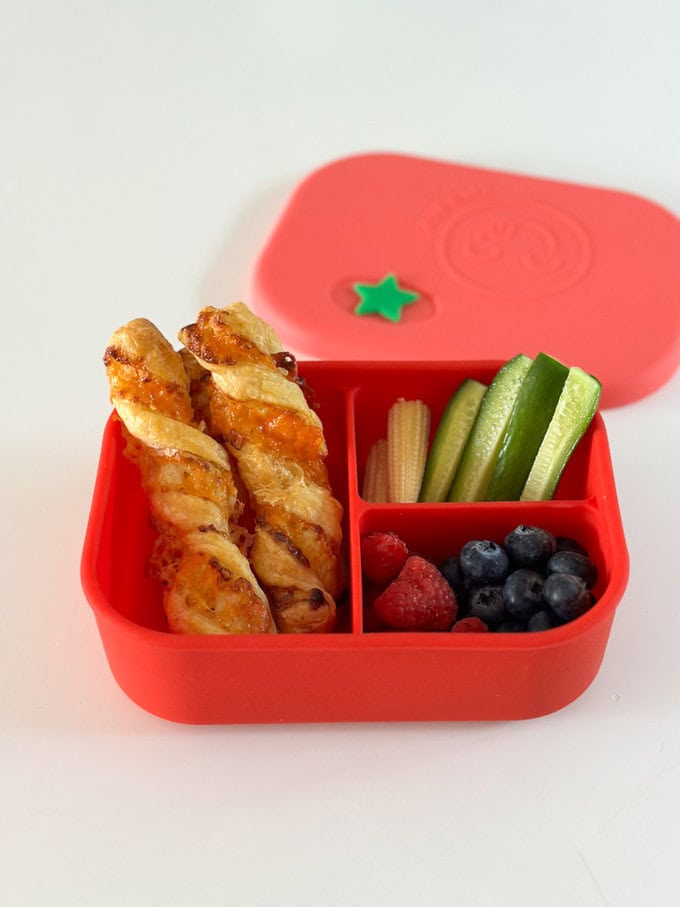
Delicious puff pastry cheese twists made with just four simple ingredients. A brilliant alternative to sandwiches for lunchboxes.

If you’re looking for some non-sandwich packed lunch ideas for your kids for school or nursery then try these Puff Pastry Cheese Twists.
If your kids love sandwiches then I just want to say that there is absolutely nothing wrong with sending them in with a simple ham or cheese sandwich everyday. The most important thing when it comes to school lunches is that your child is eating something!
But at the same time if they’re saying they would like something a bit different then you might want to give these cheese twists a go.

Ingredients
This recipe uses 4 simple ingredients.
- A roll of puff pastry – I generally use the refrigerated kind but if it’s frozen make sure you fully defrost it first.
- Cheese spread
- Grated cheese – I use a mixture of cheddar and red leicester cheese which helps to give it that lovely orange colour.
- Milk – to brush on top but you can use a beaten egg if you prefer.
How To Make Puff Pastry Cheese Twists

- Unroll the puff pastry onto a chopping board, keeping it on the paper that it comes in.

- Use a cheese spread like this one and spread it all over the pastry.

- Add the grated cheese to the right hand side of the pastry.

- Fold the lefthand side of the pastry over onto the cheese side. I find it easier to do this by lifting up the paper underneath rather than lifting the pastry itself. Then press down with your hands to stick together.

- Cut the pastry into strips approximately 2cm thick.

- Pinch the top and bottom end of the strips then twist.
Once all the pastry strips have been twisted, place them onto two lined baking trays.
Brush the twists with some milk then bake in the oven for 12-14 minutes.

The Cheese Twists will still be quite soft when you remove them from the oven so leave them to cool for a few minutes before lifting them off the trays.

Substitutions
If you have food allergies in your family then there are some easy substitutions that you can make in this recipe.
- Gluten Free – these cheese twists can easily be made gluten free by using gluten free puff pastry
- Dairy Free – you can also substitute for non-dairy cheese spread and grated cheese.
- Milk Wash – you can use non-dairy milk for the milk wash or use a beaten egg instead.

FAQ
They will keep in an airtight container for up to 3 days. They won’t stay crispy for that long but you can reheat them in the oven if you like.
Yes you can. The best way to do this is to freeze them before you cook them. Follow all the steps as normal stopping before you add the milk wash. Freeze the twists in a single layer on a tray or plate until hard. Then transfer to a freezer bag or container. Bake them as normal, adding an extra few minutes to the cooking time.
Looking for more kid-friendly recipes like this? Try these:

Puff Pastry Cheese Twists
Description
Delicious puff pastry cheese twists made with just four simple ingredients. A brilliant alternative to sandwiches for lunchboxes.
Ingredients
- 1 sheet (320g) puff pastry
- 3 tbsp cheese spread
- 100g grated cheese (I used a mix of cheddar and red leicester cheese)
- 1 tbsp milk
Instructions
- Preheat the oven to 200c fan and line two baking trays with parchment paper.
- Unroll the puff pastry onto a chopping board, keeping it on the paper that it comes in.
- Use a cheese spread like this one and spread it all over the pastry.
- Add the grated cheese to the right hand side of the pastry.
- Fold the lefthand side of the pastry over onto the cheese side. I find it easier to do this by lifting up the paper underneath rather than lifting the pastry itself. Then press down with your hands to stick together.
- Cut the pastry into strips approximately 2cm thick.
- Pinch the top and bottom end of the strips then twist.
- Place the twists on the two baking trays and brush them with a little milk.
- Bake in the oven for 12-14 minutes until golden brown.
Notes
These Cheese Twists will keep in an airtight container for up to 3 days. They won’t stay crispy for that long but you can reheat them in the oven if you like.
The best way to freeze these Cheese Twists is to freeze them before you cook them. Follow all the steps as normal stopping before you add the milk wash. Freeze the twists in a single layer on a tray or plate until hard. Then transfer to a freezer bag or container. Bake them as normal, adding an extra few minutes to the cooking time.

